Drywall Installation Las Vegas is a common DIY home improvement project that most homeowners can handle with the right tools. But it’s important to follow certain tips to ensure that your drywall looks like it was installed by a professional.
Before hanging drywall, check that the framing is flat and perpendicular from one end of a stud to the other. Also, make sure that no seams line up with the corners of doors or windows.
Drywall is a crucial component of any construction project. Not only does it provide the frame for your walls and ceilings, but it also offers insulation, fire resistance, moisture control, and other benefits that make your home more comfortable and energy-efficient. However, it is important to choose the right thickness of drywall for your needs. Thicker drywall is often more durable and will last longer, but it can also be more expensive.
In order to choose the correct thickness for your project, you must consider a number of factors, including the location, climate, and other environmental concerns. For example, if you live in an area with high levels of noise pollution, you may want to opt for drywall that is designed for soundproofing. Similarly, if your project will be located in an area with high humidity levels, you may want to select a product that is resistant to moisture damage and mold growth.
When selecting a drywall thickness, it is also necessary to consider the aesthetic of the space. Different drywall products offer different finishes, and it is important to choose a thickness that will complement the overall look of your space. For instance, if you are looking for a more modern style, you might want to select a smooth finish instead of a rugged texture.
Once you have selected the thickness of drywall for your project, it is important to accurately measure the space before cutting the sheets. This will help to ensure that the drywall fits correctly and will be properly supported once it is installed. To measure, use a T-square and carefully mark the line where you want to cut. Then, carefully score the drywall with a utility knife and snap it along the mark.
Before installing your drywall, be sure to clear out the work area and lay down a drop cloth to protect your floors from any dust or debris. It is also recommended that you purchase 10% more drywall than you need to account for any mistakes. Once you have the drywall in place, it is important to sand the edges of the sheets and touch up any imperfections with joint compound. This will help to prevent cracks and dents once the paint is applied.
Preparing the Surface
When it comes to building and refinishing walls, surface preparation is a key factor in achieving the perfect finish. In order for a new layer to adhere well and improve durability, the old layer must be cleaned thoroughly. This process involves removing any dust or dirt and smoothing out rough spots. The result is a clean and even surface that can be painted or finished to the client’s specifications.
Drywall, also known as wallboard or gypsum board, is a building material used for interior walls. It is commonly found in residential homes and commercial buildings and provides a cost-effective solution to construction problems. If you’re planning to install drywall in your home or business, it is important to prepare the space by clearing the work area, securing any necessary permits and approvals, and making sure that the drywall materials are appropriate for the room.
Before you start hanging drywall, take accurate measurements of the walls and ceilings to determine the number of drywall sheets that will be needed for the project. This will help prevent any costly mistakes or delays and ensure that the resulting wall system is structurally sound.
It’s also a good idea to apply cement patching compound to any holes or other imperfections in the surface before starting to hang drywall. This will make the final surface more consistent and even, which can enhance the appearance of a room and increase its overall value. This is especially important in the case of commercial drywall, where the aesthetically pleasing finish of walls and ceilings contributes to a positive customer experience and enhanced brand image.
Another important step in preparing the space for drywall is installing blocking along the walls where fixtures will be mounted. This will provide additional support and stability for heavy objects, such as cabinets or shelves. It’s important to properly install blocking in order to avoid any drywall damage or warping.
If you’re hiring a professional contractor to handle the installation of your drywall, it’s wise to discuss any specific preferences or requirements with them before beginning the work. They’ll be able to recommend the best materials for your project and ensure that the installation is completed to your exact specifications. This will help avoid any potential problems down the road, such as regulatory compliance issues or the need for costly corrections.
Hanging the Sheets
Drywall is the most common construction material used in homes today. Whether you’re doing a complete home remodel or simply installing new walls in a room, drywall can help reduce costs and make the job much easier. However, drywall installation requires a certain amount of attention to detail. The more precise you are in your measurements and placement, the less time you’ll have to spend repairing mistakes later on. That’s why it’s important to follow these best practices for hanging drywall.
Before starting your drywall project, carefully measure the space to determine how many sheets of drywall you’ll need. Be sure to take into account any cutouts for windows and doors and record the distances between studs. This will help you plan your layout and ensure that all the joints will be within easy reach for taping later on.
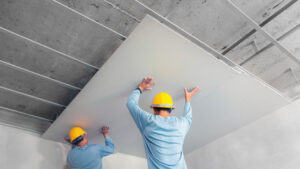
When hanging drywall, start with the ceiling and then move to the walls. This will minimize the number of seams you’ll need to tape and will help to avoid any potential cracking down the line. Additionally, using the same technique on all areas of your home will create a consistent look that is more attractive than a patchwork job.
Always use screws rather than nails when screwing drywall panels. Screws drive in faster and have a much smaller chance of damaging the face of the drywall than nails do. Screws are also less likely to pop, which can damage the wallboard and cause more work down the road.
When screwing the first panel, use a lift or an assistant to position it against a joist. Make sure that it is positioned properly so that one edge fits flush against the wall and another is resting against the ceiling board. Then, secure five evenly-spaced screws through the joist and into the drywall.
Be careful not to drive the screw heads too far in, as this could damage or tear the paper and reduce its holding power. In addition, you should never drive a screw through the drywall core, as this can weaken it.
When you’re done hanging the sheets, run a putty knife over every single screw head to ensure that they are fully set. It’s a common mistake for homeowners to skip this step, but it will save your taper a lot of grief later on.
Finishing the Walls
The process of turning raw drywall into a finished space requires both science and art. High-quality drywall materials have smooth surfaces, which facilitate the application of joint compound and sanding, and result in a more visually appealing finish. In addition, a smooth surface is easier to prep for paint and will have a long lifespan.
Drywall is also flexible and can be shaped to accommodate many different applications. For example, a homeowner may install a decorative molding to add a unique visual aesthetic to their home or business. They can also apply a variety of textures and finishes, such as sprayed orange peel or knockdown texture. These applications provide a wide range of visual effects, from contemporary to rustic.
After a wall or ceiling is hung, it is important to ensure that the seams are properly taped and mudded. This step is critical for both a professional look and strength of the structure. When done correctly, a seam will be almost invisible and the drywall will not be prone to future damage from water, insects, or mold.
To begin the process, remove any loose or uneven drywall sections of the ceiling or wall. It is a good idea to do this in stages, starting with the smallest area of the room, as it can be difficult to handle large sections. If you find any dents or gouges, repair them with a putty knife or a drywall tool. Be sure to sand the repaired areas smooth before applying any additional layers of joint compound or sanding.
Once the joints are ready, cover them with a layer of lightweight joint compound or mud. This should be rolled out with a drywall knife and allowed to dry according to the manufacturer’s recommendations. Afterward, the mud should be sanded with a sanding tool to create a smooth and even finish.
For an added level of detail, cover the outside corners of the walls with a metal corner bead. This will prevent the drywall from being scratched or dented, and it provides a neater appearance than just using a piece of tape. It is also a good idea to run a putty knife over any screw heads to ensure that they are set below the surface. This will protect them from future damage and make it easier for a painter or other contractor to work on the wall or ceiling in the future.