Uneven concrete surfaces in apartment complexes are not only unsightly but also pose safety risks. However, repairing them with Concrete Leveling Dallas can save owners and tenants money over replacing them completely.
Choosing the right contractor requires careful vetting. A reputable service provider should possess a thorough understanding of different leveling methods and use innovative advancements to ensure effective results.
Concrete can be very durable, but it’s also vulnerable to environmental pressures that can compromise its structural integrity. One of these pressures is soil movement, which can cause the slab to sink or rise, creating a misaligned surface that weakens the structure. Concrete leveling lifts sunken or uneven slabs and restores their proper position, preventing future damage and increasing structural longevity.
Uneven concrete surfaces are not only unsightly, but they can also be a safety hazard. This is especially true if the uneven slabs are located in areas of the home or business that see heavy foot and vehicle traffic. Concrete leveling can repair these issues and eliminate the tripping hazards that often result from them.
Professional concrete leveling services use advanced techniques and materials to ensure high-quality results. These include laser-guided systems and digital monitoring, which improve accuracy and precision, and reduce the impact on surrounding property. These methods also promote sustainability and efficiency, reducing waste and saving money for the customer.
Whether you’re an architect or a homeowner, you can make your concrete structures last longer by using concrete leveling to stabilize and reinforce them. The process involves injecting a special material underneath the surface to level it and fill any cracks or gaps. It’s an ideal solution for outdoor spaces, as well as indoor areas that experience frequent foot or vehicle traffic.
The injected material can be made from sand, cement, or other types of aggregates. The process is typically completed within 24 hours, and the results are long-lasting. Concrete leveling is an economical solution for residential and commercial properties, as it prevents structural problems that can lead to costly repairs or replacements down the line.
However, if your concrete has sustained significant damage due to natural disasters or other circumstances beyond your control, it may be impossible to save it through concrete leveling methods. In such cases, complete concrete replacement may be the best option. Contact your local concrete leveling specialists for a free inspection and estimate before the problem gets out of hand.
Safety
Uneven concrete surfaces not only detract from the appearance of property, but also pose a safety risk and potential liability issues. Tripping hazards from sunken and cracked concrete are particularly dangerous for the elderly, children, and individuals with mobility challenges, making it essential to address these issues promptly. Concrete leveling addresses the underlying causes of uneven and sinking concrete to create stable, durable surfaces that are safer for all users.
Unlike other repair methods, concrete leveling does not replace or remove the existing slabs; it fills voids and raises them to their proper position. This method is often more affordable than replacing the affected concrete, and it also requires less labor. It is recommended to consult with local specialists to receive a detailed quote for your specific project.
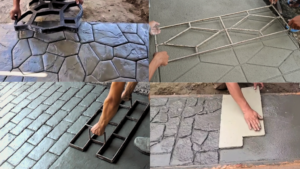
A concrete leveling company can offer a variety of methods for lifting and stabilizing sunken slabs, including mudjacking and polyurethane foam injection. Both methods have varying costs, but they all provide long-lasting results. They can be used to lift patios, driveways, pool decks, and other surfaces. These methods are also suitable for resurfacing projects. Choosing the right repair method will depend on the size of the area and the severity of the damage.
While repairing sunken concrete with these methods is usually more cost-effective than replacement, it can be difficult to match the new surface with the existing concrete. This is especially true for large areas that are frequently walked on or trafficked. A concrete leveling company can use a process called PolyRenewal to achieve even, beautiful surfaces that look like the originals.
Another important consideration when choosing a concrete leveling company is its reputation for quality work. A reliable firm will have extensive experience in the industry and will offer competitive prices. In addition, it should be able to offer a warranty for its work.
Regular inspections are the best way to ensure that your concrete is in good condition. If you see signs of damage, contact a concrete leveling company as soon as possible to prevent it from deteriorating further. A professional will be able to inspect your concrete for free and recommend the appropriate repair methods.
Aesthetics
Leveled concrete surfaces not only enhance the safety and functionality of a structure but also contribute to its overall aesthetics. Uneven concrete can be a tripping hazard, especially for elderly individuals or those with mobility issues, and can cause problems with water drainage, furniture placement, and other aspects of interior and exterior design. Concrete leveling services efficiently raise and level sunken concrete to their original placement, restoring the area’s safety and visual appeal.
When it comes to selecting a concrete leveling contractor, the right choice should have both experience and a strong commitment to using cutting-edge technology. They should also be able to provide clear quotes and comprehensive project plans to ensure their clients are aware of the methods they plan to use. This transparency helps establish trust and sets the stage for a successful partnership throughout the course of the project.
A concrete leveling contractor with a dedicated focus on using advanced techniques will be more likely to have invested in specialized equipment and training for their staff. These tools can significantly improve the outcome of the repair and help to reduce the amount of material used, thereby minimizing costs. In addition, the latest technology can also be utilized to prevent damage and deterioration caused by soil movement and other environmental factors.
The process of concrete leveling can be done in a number of ways, depending on the condition of the concrete and its location. In general, the process involves drilling a series of small holes, about one inch in diameter, into the surface and then hydraulically pumping a limestone-based slurry beneath the slab. This slurry fills all the voids in the concrete and lifts it back into place. This method of leveling concrete is often referred to as mudjacking or polyjacking and can be performed with minimal disruption to the surrounding landscaping.
A qualified professional will assess the condition of your concrete and recommend the best repair strategy for your situation. If your concrete is in severe disrepair, it may be beyond the point of leveling and a full replacement will be necessary. To avoid this, contact a concrete repair specialist for a free inspection and cost estimate today!
Cost
Many homeowners are hesitant to hire concrete leveling contractors because they fear the cost will be prohibitive. However, there are a number of factors that can affect the price of this service, including the size of the affected area and the leveling method used. It’s also important to remember that just because a company has a big advertising budget does not necessarily mean they are reputable or will provide quality service. A good way to determine whether a company is worth hiring is by requesting a free inspection and quote without any commitment.
The leveling process itself is much less expensive than concrete replacement, as it does not require demolition or the use of heavy equipment. Additionally, it takes less time to complete and is more aesthetically pleasing. Concrete leveling companies should be able to give you an accurate quote for the project based on the size of the affected area and the severity of the damage.
Another important factor that influences the cost of concrete leveling is the extent to which the existing concrete has deteriorated. Severely damaged concrete isn’t just an eyesore; it can lead to further problems for the structure of your home and create tripping hazards. In these cases, it’s best to consult a professional about the possibility of concrete replacement.
A final factor to consider when determining the cost of concrete leveling is the amount of damage to the surrounding landscape and landscaping. When the surface of a sidewalk or patio sinks, it can cause uneven terrain and even affect your property value. Concrete leveling can prevent this from happening by addressing the underlying causes of the problem.
In the long run, it’s essential to have a thorough understanding of the benefits of concrete leveling and the associated costs. This will help you make an informed decision when choosing a contractor. Ideally, you should work with a local concrete repair expert who will perform a complimentary inspection and provide a tailored quote for the specific needs of your property. This approach ensures that the resulting repair will be both effective and affordable.